
Everything on this page is non-destructive. The original audio file is left untouched while you edit, and your adjustments are written to a file when you export. Use Undo (Windows: Ctrl+Z, macOS: Cmd+Z) to step back.
Opening the detail view
Select exactly one file in the list and run Show Details (Details on macOS) in the View menu. The shortcut is Ctrl+I on Windows and Cmd+I on macOS.
The detail view is available only while exactly one file is selected. It cannot be opened with a multi-file selection.
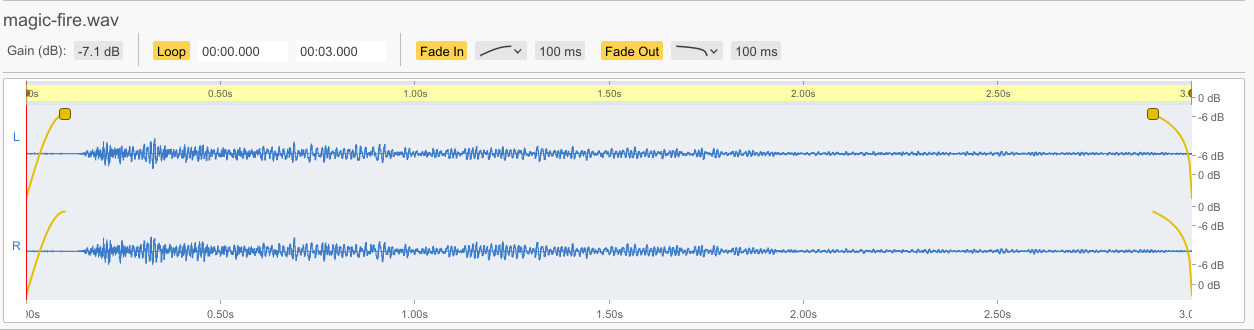
Inspecting the waveform
Hover over the waveform to see the time at the cursor position. When the loudness timeline is available, Momentary Loudness and Short-term Loudness are shown as well. Until the analysis finishes, Loudness: Loading... is displayed.
Click on the waveform to move the playback position there.
Zoom with the following:
| Action | Windows | macOS |
|---|---|---|
| Horizontal zoom | Ctrl + mouse wheel | Cmd + mouse wheel |
| Zoom in | Ctrl++ | Cmd++ |
| Zoom out | Ctrl+- | Cmd+- |
| Reset zoom | Ctrl+0 | Cmd+0 |
Auditioning a selection
Drag on the waveform to make a selection range. A selection is used to specify trims and loop ranges, and also to replay just that part of the file.
While a selection exists, playing with Space plays only the selection, starting from its head. What happens at the end depends on the loop mode.
| Loop mode | Behavior with a selection |
|---|---|
Off | Playback stops at the end of the selection |
All | The selection plays repeatedly |
Selection | Loops at the loop points as usual only when the loop-point range lies entirely inside the selection; otherwise playback runs to the end and stops |
Pausing with Space during playback resumes from that position on the next press. If you changed the selection while paused, playback restarts from the head of the new selection. Press Esc to clear the selection, and Space behaves as usual again.
Cycle the loop mode with the Loop button on the transport, or with the shortcut (Windows: Ctrl+L, macOS: Cmd+L), which steps through Selection → All → Off.
Adding fades
One file at a time
Fade In and Fade Out in the detail view each let you toggle the fade, choose its curve, and set its length. You can also drag the fade handles on the waveform left and right to change the length directly. The display updates while you drag, and the value is confirmed when you release the mouse.
The maximum length is the file’s effective length. While a trim is active, the trimmed length is the maximum.
In bulk
From Fade in the Edit menu, open Selected... (the selected files) or All... (every file). Enable Fade In and Fade Out as needed, set the curve and length, and press Apply. Combinations you use often can be stored in the Preset selector.
Setting up a loop
Toggle the loop on and off with Loop. The start and end times can be entered directly in mm:ss.mmm or hh:mm:ss.mmm format, or edited on the loop lane.
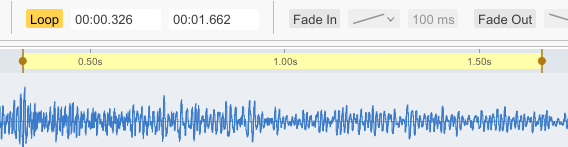
The loop lane supports the following:
| Action | Result |
|---|---|
| Drag on an empty part | Create a new loop range |
| Drag the left or right handle | Move the start or end point |
| Drag the middle of the range | Move the whole range, keeping its length |
| Click an existing range | Toggle the loop on and off |
| Double-click the lane | Reset the range to the whole file |
To set a loop by ear, build it from a waveform selection. Drag on the waveform to make a selection, then right-click the selection and choose Set Loop to Selection. The selection becomes the loop range and the loop is enabled.
When Snap loop boundaries to nearby zero crossings is enabled in General under Preferences, boundaries snap to a nearby zero crossing when confirmed, which avoids the click that can appear at a loop seam.
The end time shown on screen is the time of the last sample included in the loop.
To carry a loop range into the exported file, choose a format that supports loop metadata — see Exporting.
Trimming (keeping a range)
Drag on the waveform to make a selection, then right-click the selection and choose Trim to Selection to keep only that range and cut away everything before and after it. The same action is available from the Edit menu (Windows: Ctrl+T, macOS: Cmd+T).
Trimming is non-destructive and never modifies the original file. It can be undone, and Clear Trim (from the right-click menu or the Edit menu) removes the trim at any time.
When you trim, an existing loop range is automatically remapped onto the new timeline. If the loop lies entirely outside the kept range, the loop is disabled (undo restores it).
Switching the trimmed display
Full Timeline for Trimmed Files in the View menu (Windows: Ctrl+Shift+T, macOS: Cmd+Shift+T) switches how trimmed files are drawn.
- Enabled: the whole source timeline is shown and the trimmed-away regions are dimmed and inert (right-click a dimmed region to choose
Clear Trim). Useful while you are still deciding where to cut - Disabled: only the kept range is shown, matching what will be bounced
The choice is remembered across launches.
Files with an active trim show a [ ] icon next to their mini waveform in the list; hover over it to see the kept range. The mini waveform in the list always shows the trimmed content.
The same thing in the CLI
Fades, loops, and trims are specified with --op.
a9a_cli render input.wav \
  --out output.wav \
  --op trim start=48000 end=480000 \
  --op fade-in duration=100ms curve=equal_power \
--op fade-out duration=250ms curve=s_curve| Operation | Required keys | Optional keys |
|---|---|---|
fade-in | duration | curve |
fade-out | duration | curve |
loop | start, end | - |
trim | start, end | - |
duration accepts 100ms, 1s, or an integer millisecond value without a suffix. curve accepts linear, equal_power, s_curve, log, and exp.
For loop and trim, start and end are frame counts and end is exclusive. Both require start < end.
This page was written with generative AI.