
Screen layout
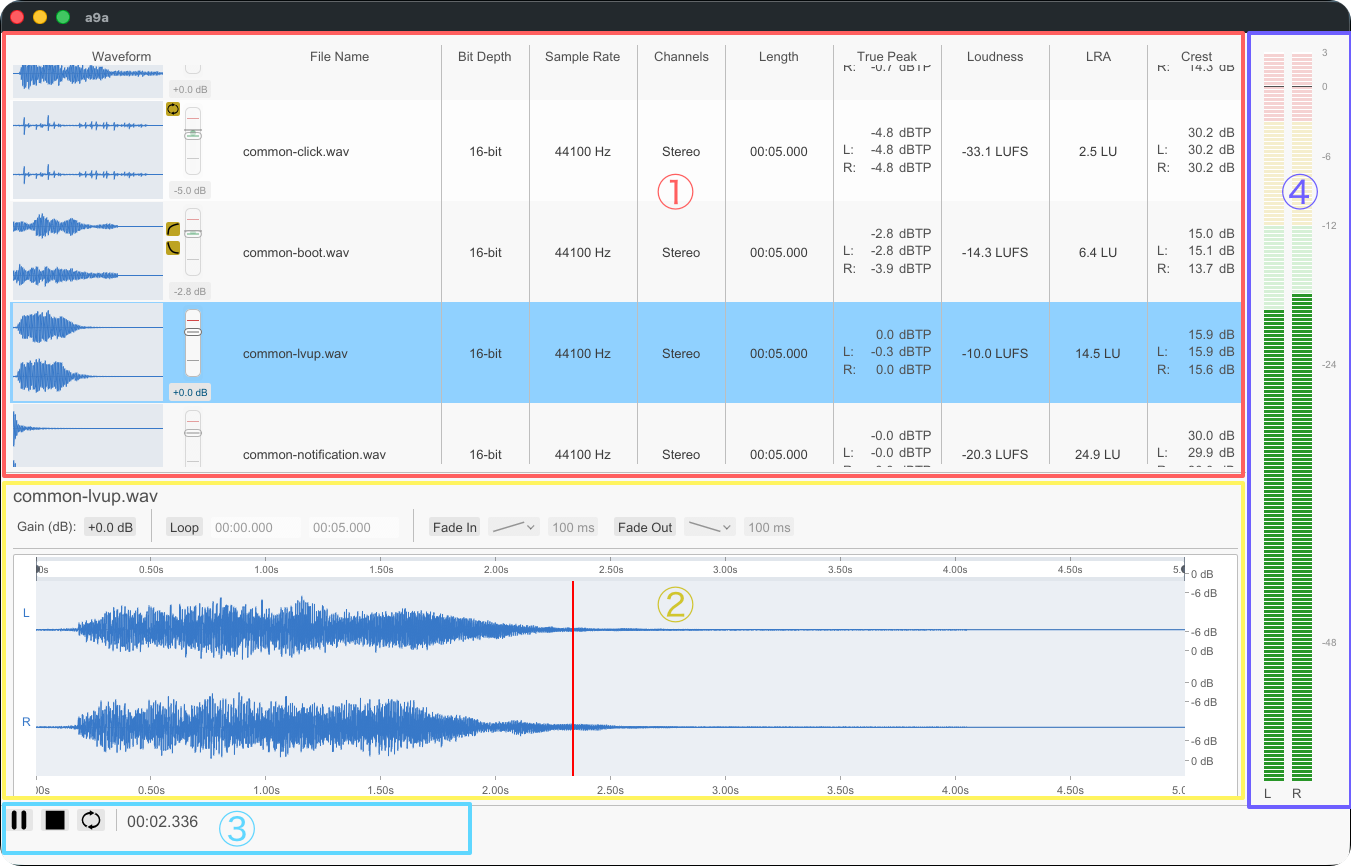
When you launch the app, the list of loaded files (1) appears in the center. Selecting a single file opens the detail view (2) below it, where you can zoom into the waveform and edit precisely. Along the bottom of the window sits the transport (3) with play, pause, stop, and loop toggle controls, and on the right you can monitor playback volume with the level meters (4).
The menus appear at the top of the application window on Windows, and in the global menu bar at the top of the screen on macOS.
Loading files
There are two ways to load files.
- Choose
Open...in theFilesmenu and select the audio files (multiple selection is supported) - Drag files selected in Finder / Explorer onto the list area and drop them
The supported formats are wav, flac, aif, aiff, aifc, ogg, oga, mp3, m4a, and aac. For AAC (m4a / aac), HE-AAC v1/v2 can be loaded in addition to AAC-LC. A progress dialog is shown while files are loading.
Files that are already in the list, and duplicates among the files selected at the same time, are not added again.
On the first launch, and on launches after the Terms of Service have been updated, the Terms of Service screen is displayed. Review the terms and accept them to proceed.
List columns
| Column | Content |
|---|---|
Waveform | Miniature waveform, plus loop / fade / trim state icons and the per-row gain control |
File Name | File name. Hovering over a row shows the full path of the source file |
Bit Depth | Bit depth |
Sample Rate | Sample rate |
Channels | Channel count |
Length | Duration |
True Peak | True peak |
Loudness | Integrated loudness (LUFS) |
LRA | Loudness range |
Crest | Crest factor |

Working in the list
| Action | How |
|---|---|
| Select one file | Click |
| Add to or remove from the selection | Ctrl + click on Windows, Cmd + click on macOS |
| Select a range | Shift + click |
| Move the selection | Up and down arrow keys |
| Sort | Click a column header; clicking it again toggles ascending and descending |
| Adjust gain | Drag the gain control at the right end of the waveform column on a selected row |
| Open a bulk dialog | Right-click a row and choose Loudness... / Gain... / Fade... |
| Remove from the list | Delete or Backspace |
Files with a loop or fade-in/fade-out configured show icons; hover over them to see the current settings. Files with an active trim show a [ ] icon; hover over it to see the kept range.
Removing a file only removes the list entry — the original audio file is not deleted.
Bulk dialogs opened from the right-click menu apply to the selected files, just like Selected... in the Edit menu. Right-clicking a row that is not selected opens the menu with only that row selected.
Playback
Playback is available when exactly one file is selected. Use Play / Pause on the transport to toggle between playing and pausing, and Stop to stop. Each press of Loop cycles the playback loop mode.
| Loop mode | Behavior |
|---|---|
Selection | Repeats the loop range configured in the detail view |
All | Repeats the entire file |
Off | Disables loop playback |
The L and R level meters on the right side of the window give you a rough view of the playback volume.
For playback behavior while a waveform selection exists, see Editing Waveforms.
Preferences
Preferences configures display, playback, and default bounce settings.
General
| Setting | Description |
|---|---|
Theme | Color scheme: System, Light, or Dark |
Snap loop boundaries to nearby zero crossings | Whether loop boundaries snap to a nearby zero crossing |
Audio
| Setting | Description |
|---|---|
Device | The playback device |
Sample Rate | The device default or a supported sample rate |
Buffer Size | The playback buffer size |
Bounce
Overwrite existing files by default controls whether overwriting is allowed by default when bouncing. You can also configure the defaults for WAV, FLAC, AIFF, Ogg Vorbis, MP3, and AAC.
About
About shows the application name, its version, the engine version, the application license, and third-party licenses. On the Application License screen you can switch the display between Japanese and English.
Menus and shortcuts
In the tables below, the Windows and macOS columns give the shortcut on that OS. None means no shortcut is assigned, and — means the item does not exist on that OS.
Menu differences between OSes
| Menu | Windows | macOS |
|---|---|---|
a9a application menu | No | Yes |
Files / File | Yes | Yes |
Edit | Yes | Yes |
View | Yes | Yes |
Transport | Yes | Yes |
Help | Yes | Yes |
On Windows, About lives in the Help menu and Preferences in the Files menu. On macOS, About and Preferences are gathered in the a9a application menu. On both OSes, the Help menu contains a9a Help, which opens the manual.
The a9a application menu (macOS only)
| Item | Shortcut | Function |
|---|---|---|
About a9a | None | Open the About screen |
Preferences | Cmd+, | Open Preferences |
Quit a9a | Cmd+Q | Quit the application |
Files / File
| Item | Windows | macOS | Function |
|---|---|---|---|
Open... | Ctrl+O | Cmd+O | Load audio files |
Preferences | Ctrl+, | — | Open Preferences (on macOS it lives in the a9a menu) |
Bounce > Selected... | Ctrl+Shift+B | Cmd+Shift+B | Export the selected files |
Bounce > All... | Ctrl+Alt+B | Cmd+Option+B | Export all files |
Edit
| Item | Windows | macOS | Function |
|---|---|---|---|
Undo | Ctrl+Z | Cmd+Z | Undo the last operation |
Redo | Ctrl+Y or Ctrl+Shift+Z | Cmd+Shift+Z | Redo the undone operation |
Trim to Selection | Ctrl+T | Cmd+T | Keep only the waveform selection |
Clear Trim | None | None | Remove the trim |
Loudness > Selected... | Ctrl+Shift+L | Cmd+Shift+L | Apply loudness adjustment to the selected files |
Loudness > All... | Ctrl+Alt+L | Cmd+Option+L | Apply loudness adjustment to all files |
Gain > Selected... | Ctrl+Shift+G | Cmd+Shift+G | Apply peak-based adjustment to the selected files |
Gain > All... | Ctrl+Alt+G | Cmd+Option+G | Apply peak-based adjustment to all files |
Fade > Selected... | Ctrl+Shift+F | Cmd+Shift+F | Apply fades to the selected files |
Fade > All... | Ctrl+Alt+F | Cmd+Option+F | Apply fades to all files |
View
| Item | Windows | macOS | Function |
|---|---|---|---|
Show Details / Hide Details | Ctrl+I | — | Toggle the detail view |
Details | — | Cmd+I | Toggle the detail view |
Zoom In | Ctrl++ | Cmd++ | Zoom into the waveform |
Zoom Out | Ctrl+- | Cmd+- | Zoom out of the waveform |
Reset Zoom | Ctrl+0 | Cmd+0 | Reset the zoom |
Full Timeline for Trimmed Files | Ctrl+Shift+T | Cmd+Shift+T | Switch the waveform display for trimmed files |
Transport
| Item | Windows | macOS | Function |
|---|---|---|---|
Play / Pause | Space | Space | Toggle between playing and pausing |
Stop | None | None | Stop playback |
Loop > Loop Selection | None | None | Play the loop range |
Loop > Loop All | None | None | Loop the entire file |
Loop > Loop Off | None | None | Disable loop playback |
Help
| Item | Windows | macOS | Function |
|---|---|---|---|
a9a Help | F1 | Cmd+? | Open the built-in manual |
About | None | — | Open the About screen (on macOS it lives in the a9a menu) |
Running a9a Help opens the manual in the OS default browser on Windows, and in the Help Viewer on macOS. On macOS, the search field in the Help menu searches both menu items and help content.
Shortcuts outside the menus
| Operation | Windows | macOS | Description |
|---|---|---|---|
| Cycle the playback loop mode | Ctrl+L | Cmd+L | Cycles Selection → All → Off |
| Remove the selected files from the list | Delete / Backspace | Delete / Backspace | Removes list entries only; source files are not deleted |
| Clear the waveform selection | Esc | Esc | Clears the selection range |
| Close a dialog | Esc | Esc | Acts as cancel or close in most dialogs |
When operations are restricted
Playback and the detail view are both available only while exactly one file is selected. While a dialog is open, the usual shortcuts and editing operations are temporarily disabled. During loading and bouncing, a progress dialog stays in front and no other operations are possible until it completes.
This page was written with generative AI.