
Which adjustment to use
a9a offers three volume-related adjustments. They serve different purposes, so start by picking the right one.
| What you want | Adjustment | Measured against |
|---|---|---|
| Make files sound equally loud | Loudness | Integrated LUFS, per ITU-R BS.1770 |
| Cap every file at the same peak level | Target peak (Gain) | True peak (dBTP) |
| Nudge one specific file up or down | Gain (dB) | A relative value in dB |
Use loudness when you want to even out level differences between files. The same applies when a target is already fixed in LUFS. Target peak is for material that is already consistent, where you simply want to align amplitude ceilings.
Matching loudness (GUI)
From Loudness in the Edit menu, open Selected... (the selected files) or All... (every file in the list). Right-clicking a row in the list and choosing Loudness... opens the same dialog, applying to the selected files.
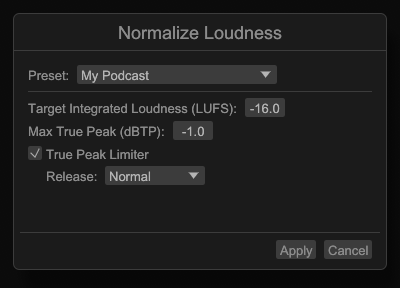
Set the values and press Apply.
| Setting | Description |
|---|---|
Target Integrated Loudness (LUFS) | The integrated loudness to reach |
Max True Peak (dBTP) | The true peak ceiling |
True Peak Limiter | Enables the look-ahead limiter (off by default) |
Release | How quickly the gain recovers after the limiter engages |
True peak ceiling and the limiter
With True Peak Limiter unchecked (the default), the gain is capped so the true peak stays within Max True Peak. That is the safe behavior, but on peaky material the gain cannot be raised far enough and some files may not reach the target LUFS. Files that fall short are reported as warnings after applying.
When True Peak Limiter is checked, a look-ahead limiter keeps the true peak within Max True Peak while still reaching the target loudness. Use it when isolated peaks are the only thing holding a file back from your target.
Choosing a release
Release controls how quickly the gain recovers after the limiter engages. The selector is available only while True Peak Limiter is on.
| Setting | Time | Suits |
|---|---|---|
Fast | 30 ms | Percussive material such as rapid clicks; reduces pumping and loudness loss |
Normal | 100 ms (default) | General material |
Slow | 300 ms | Bass-heavy material; avoids distortion |
Every setting keeps the true peak within Max True Peak.
Saving presets
Saving values you use often lets you recall them in one step.
In the Preset selector at the top of the dialog, choose Save as preset... at the bottom of the list and enter a name to store the current values. An existing preset with the same name is overwritten. Saved presets are kept across app restarts.
Picking a preset fills the matching inputs, and changing any value switches the selector to Custom. While no presets are saved yet, the selector shows No Presets. While a preset’s values are recalled, the same list offers Delete '<name>' to remove it.
Presets in this dialog cover Target Integrated Loudness and Max True Peak as well as the True Peak Limiter toggle and the Release selection. The Gain and Fade dialogs have presets too, and they work the same way.
Matching a target peak (GUI)
From Gain in the Edit menu, open Selected... or All..., enter Target Peak (dBTP), and press Apply. Each file’s gain is adjusted so its true peak lands on that value.
Adjusting a single file (GUI)
To move one file up or down, adjust its gain directly.
- From the list: drag the gain control at the right end of the waveform column on a selected row
- From the detail view: enter a value in
Gain (dB)
Both are relative gain changes, not normalization to a target value.
The same thing in the CLI
Loudness normalization is specified with --op loudness.
a9a_cli render *.wav \
  --out-dir out \
  --same-format \
  --op loudness target=-16LUFS max-true-peak=-1dBTP
To enable the true peak limiter and set a release, add limiter and release. They correspond to True Peak Limiter and Release in the GUI.
a9a_cli render *.wav \
  --out-dir out \
  --same-format \
  --op loudness target=-16LUFS max-true-peak=-1dBTP limiter=on release=slow
Omitting limiter means off; omitting release means normal. As in the GUI, when limiter=off leaves a file short of the target, a warning is printed to stderr.
To apply a fixed amount of gain, use --op gain.
a9a_cli render input.wav --out output.wav --op gain db=-3Checking the result
In the GUI, the Loudness and True Peak columns update after applying. Sort by those columns to confirm nothing is left out of line.
In the CLI, measure with probe. Adding --json produces machine-readable output, so checks on the exported files can be scripted — see Batch Processing and Automation.
a9a_cli probe out/*.wavThis page was written with generative AI.